
by Alexander Frolov , updated on May 8, 2024
Printing emails in Microsoft Outlook is a simple task once you know the steps. This comprehensive guide will help you navigate the Outlook interface with ease, select the right print settings and bring a message to life on paper.
Imagine that you've received an email that captures everything you've been discussing in a recent thread. It's the kind of email you want to pin on your noticeboard, tuck into your planner, or hand out in your next team meeting. But how do you take this digital message and give it a physical presence? Let's delve into the simple steps to transform your virtual conversations into tangible documents that you can touch, feel, and share around the coffee table or conference room.
To print an email in the classic desktop Outlook app, follow the steps below:

The screenshot below shows the default settings.

Done! Now, your emails are not confined to your screen but can be shared and preserved in physical form.
Tip . If you regularly print emails from Outlook, consider adding the Print button to the ribbon or Quick Access Toolbar. We have comprehensive end-to-end guides for Excel: Adding a command to ribbon and Adding a button to Quick Access Toolbar. Customizing Outlook's ribbon and QAT is essentially the same process.
in Outlook lets you print emails swiftly without the need to open each one in a separate window. Here's how to use it:
That's it! The message will be sent straight to your default printer, saving you time and clicks.

This feature is perfect for those moments when you need a hard copy of an email quickly, such as before a meeting or when you're compiling documents for reference. Remember, it uses the print settings you've set as default. If you need to make adjustments such as selecting a different printer or changing the number of copies, then use the regular Print option instead.
Tips and notes:
Printing emails in the new Outlook and Outlook 365 online can be done with ease. Here's how to do it:


Your message will pop up in a new window, formatted for printing. At the top-left corner of this window, click Print.

In the dialog box that appears, select your desired printer. Here, you can also choose your preferred style and adjust settings. With everything set up, hit Print.
Please keep in mind that the exact settings and interface may vary slightly, as the new Outlook and its web counterpart are frequently updated.
Note. The new Outlook and web app lack the option to print attachments directly from an email. You have to download the attached file to your computer first. After that, you can print the file using its default app, such as Microsoft Word, Excel, or a PDF editor.
Printing an Outlook email to a PDF is a convenient way to save a digital copy of your correspondence that's easy to share and archive. Here's how you can do it:

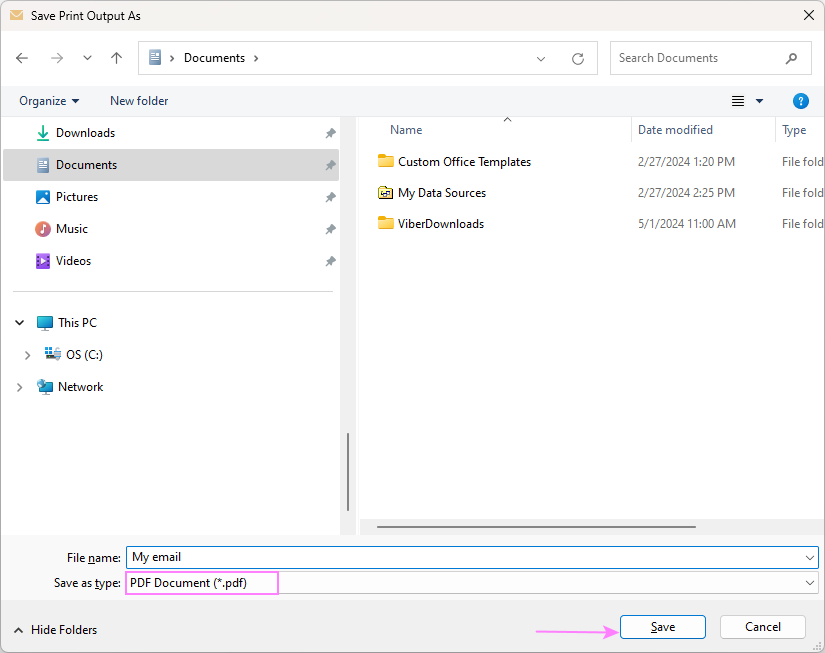
And now, you can navigate to the folder where you saved the file and check if it has been converted correctly. This method ensures that your email is not just a fleeting message in your inbox but a document that can be stored, shared, and accessed independently of your email client.
It's also possible to combine multiple emails into one PDF file and convert attachments to individual PDFs. For full details, check out How to save Outlook email as PDF.
Sometimes, you only need a snippet of your email conversation - a crucial detail, a specific instruction, or a particular quote. Printing the entire email might be overkill, so here's how to print just the part you need.
If your browser displays .mht files correctly, then you can print a portion of an email in this way:


With these steps, you can print just the part of the email that matters to you, saving ink and paper.
Note. This method does not work correctly in the current versions of some popular internet browsers. If you find that the email opens as plain text instead of html, then use the method described below for a more reliable result.
These days, printing only a part of an Outlook email can be a bit tricky. Due to changes in how browsers interpret email files, the email.mht file, which used to display as a formatted HTML document, now often presents itself as plain text. This change makes it challenging to print just a specific section of an email directly from the browser, as the email's formatting and structure are lost in the conversion to text.
However, there's no need to worry - we have a workaround that will let you print part of your email:
For example, in Adobe Acrobat or Acrobat Reader (free version), you can print the desired part of a PDF file in this way:


In the Print dialog box, click More Options under the Pages to Print, and then choose Selected graphic.
While it's unfortunate that the good old method of opening the message in a browser doesn't work as well in the current versions, saving the email as a PDF provides a reliable alternative to print only the parts you need.
Printing attachments in Outlook is a useful feature when you need physical copies of documents, images, or other files that come with an email. Here's how to manage this task efficiently:
The fastest way to print a certain attached file is this:


If the file type requires it, Outlook may prompt you to open or save the attachment before printing. Choose the option that best suits your needs.
The attachment will be sent to the default printer without any further action needed.
To include attachments in the message printout, follow these steps:
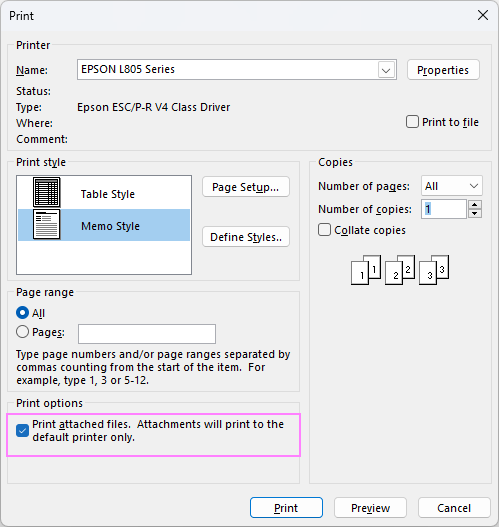
This way, you can print both the email and its attachments in one go. Once this setting is enabled, it will remain active until you choose to turn it off.
When you need hard copies of several messages, perform these simple steps:
And that's all there is to it! The selected emails will go directly to your default printer with no extra moves.

And there you have it - printing emails in Outlook made simple. These methods should cover all your needs, be it dealing with a single message or a batch of emails with attachments. So go ahead, give it a try, and take control of your emails in a way that suits your needs, whether it's for archiving, referencing, or presenting.
Table of contents
Hello
I have a problem since about 14 days when I try to print from Outlook. Every Email will be printed in "one item or one line per page". One normal page with text will have maybe 60 to 100 or more pages to be printed. Normally I would see the email in the layout frame, but it is blank. I made a test email with three short lines, the result is 11 pages to print. I cannot attach the test sample or screenshots. Please respond and help me. I will send you the sample test and the print results. thanks
Erich
How to print part of an email in New Outlook? Do you have directions on who to only print a selected part of an email? I cannot figure out how to do this or find anything on the web for it. Thank you.